I recently sought a way to adjust the brightness of a desktop monitor without having to use its physical controls. This post describes what I discovered and introduces a system-tray GUI that I created to control my monitors. Those primarily interested in the GUI can skip over the first part of the post.
A Brief Intro to DDC/MCCS for Desktop Control of Monitors
Utilities such as xrandr and xset provide some control over display settings, but these utilities can’t change the physical monitors settings such as brightness and contrast (DPMS settings excepted). For example, if a monitor’s backlight brightness is currently set to 13%, using xrandr to increase brightness just squishes the darker parts of the range up toward 13%, which is not the same as using the monitor’s physical controls to increase backlight brightness beyond 13%.
There is a VESA standard for controlling monitor settings directly from a PC. The Data Channel Channel (DDC) standard is part of the spec for external-monitor connectivity. The standard includes the DDC Command Interface (DDC/CI) which is a means for PC’s to pass commands to monitors. Actual DCC/CI commands are defined by the Monitor Control Command Set (MCCS) which includes a set of Virtual Control Panel (VCP) codes that provide read and write access to specific monitor settings. Most monitors made in the last decade have some level of support for DDC/MCCS. Onboard laptop displays don’t implement DDC, so DDC/MCCS is only applicable for externally connected monitors. USB connected external monitors normally support MCCS, but over USB, not DDC.
The ddcutil DDC/MSSC Command Line Tool
There are a few open source DDC utilities. The most practical Linux DDC utility is the command line tool ddcutil. What makes ddcutil practical is that it copes well with the spectrum of DDC and USB MCCS implementations as well as the sometimes unreliable nature of DDC communications. As an added bonus, ddcutil comes pre-packaged for Tumbleweed.
There is one core dependency for ddcutil, DDC is a i2c based protocol, so ddcutil requires the i2c-dev kernel-module. In addition to ensuring i2c-dev is loaded, those using Nvidia’s GPU driver will need to follow some ddcutil documentation to set a reliable i2c-dev speed. Full configuration instructions can be found in the ddctuil man page, the packaged help files, and at ddcutil.com.
When starting out with ddcutil, the first thing to do is to see if it can detect any monitors, for example:
% ddcutil detect --terse
Display 1
   I2C bus:             /dev/i2c-5
   Monitor:             HWP:HP ZR24w:CNT008XXXX

Display 2
   I2C bus:             /dev/i2c-8
   Monitor:             GSM:LG HDR 4K:
The reported display numbers do not correspond to X11 display numbers, they are monitor connection numbers. The numbering may change if a monitor is switched off or unplugged, if that’s a concern, ddcutil may be passed other forms of identification such as the model or serial number.
Once we know what displays are present we can send VCP codes to control the individual monitors. There are a huge number of VCP codes. Not all VCP codes are useful and not all are standardised. The ddcutil capabilities command can be used to discover what VCP codes a monitor claims to support. For example:
% ddcutil --display 2 capabilities
Model: Not specified
MCCS version: 2.1
VCP Features:
   Feature: 02 (New control value)
   Feature: 04 (Restore factory defaults)
   Feature: 05 (Restore factory brightness/contrast defaults)
   Feature: 08 (Restore color defaults)
   Feature: 10 (Brightness)
   Feature: 12 (Contrast)
   Feature: 14 (Select color preset)
      Values:
         05: 6500 K
         08: 9300 K
         0b: User 1
   Feature: 16 (Video gain: Red)
...
   Feature: 62 (Audio speaker volume)
   Feature: 8D (Audio Mute)
   Feature: F4 (manufacturer specific feature)
   Feature: F5 (manufacturer specific feature)
      Values: 00 01 02 (interpretation unavailable)
...
Some monitors are not 100% accurate or complete in their capability claims. I have one monitor that claims to have two DisplayPort input sources, but it physically only has one (changing the input to the imaginary one does nothing).
For safety ddcutil will only allow write access to known/supported codes, mystery manufacturer specific codes are solely read-only. Continuing the example from above, display 2 supports VCP code 10, the code for the brightness control, the monitors real brightness can be retrieved or set as follows:
% ddcutil --display 2 getvcp 10
VCP code 0x10 (Brightness                    ): current value =    50, max value =   100

% ddcutil --display 2 setvcp 10 90
Scripts can be written to streamline their use of particular codes. For example, I use the following brightness altering script to set the brightness on one or more monitors at a time:
#!/bin/bash
# Content of $HOME/bin/brightness
# Reads parameters: displayId newBrightness [displayId newBrightness...]
while  $# -ge 2 ]
do

    ddc_display_id="$1"
    new_brightness="$2"

    shift;shift

    old_brightness=$(ddcutil --brief --display $ddc_display_id getvcp 10 | awk '{print $4}')

    if  $new_brightness -ne $old_brightness ]
    then
        echo "INFO: $ddc_display_id setvcp 10 $new_brightness"
        ddcutil --display $ddc_display_id setvcp 10 $new_brightness
    else
        echo "INFO: $ddc_display_id already set to $new_brightness"
    fi
done
In my case I normally have two monitors connected, monitors 1 and 2, I can use the above script to set them to 80% and 90% brightness as follows:
/home/michael/bin/brightness 1 80 2 90
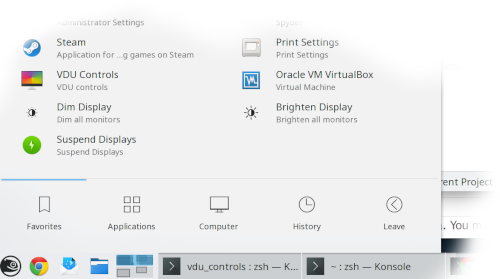
Commands and scripts such as the above can be hooked into the desktop start menu by creating KDE/Gnome desktop files in an application menu or the favourites menu. For example, my kickoff menu includes a couple of favourites for brightening and dimming my monitors for daytime and nighttime, and further favourite for monitor DPMS suspend:

The desktop entry files for the above can be constructed by right mousing on the kicker icon, selecting to edit applications, selecting an appropriate menu, and adding a new item. Alternatively .desktop files can be manually created in $HOME/.local/share/applications. My $HOME/.local/share/applications/bright\ display.desktop file contains:
[Desktop Entry]
Comment=
Exec=/home/michael/bin/brightness 1 80 2 90
GenericName=Brighten all monitors
Icon=high-brightness
Name=Brighten Display
NoDisplay=false
Path$e]=
StartupNotify=false
Terminal=0
TerminalOptions=
Type=Application
X-KDE-SubstituteUID=false
X-KDE-Username=
The file for dimming is also the same, only the brightness values and Name are different. The script associated with the favorite for Suspend Displays, doesn’t require ddcutils, loginctl lock-session and xset dpms force suspend is all that is needed.
A System-tray GUI for ddcutil - vdu_controls
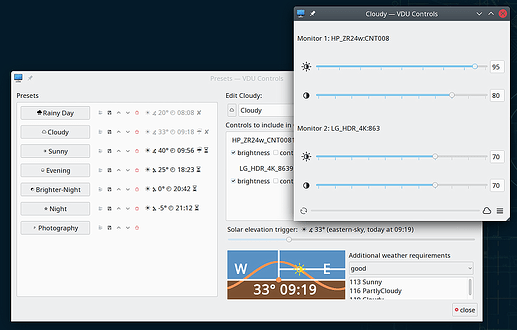
As an exercise in Qt Python scripting I created vdu_controls, a system tray app with access to a subset of MCCS controls. Here are a few screenshots of vdu_controls in various configurations:
- *vdu_controls --show brightness --show audio-volume
https://raw.githubusercontent.com/digitaltrails/vdu_controls/master/screen-shots/Screenshot_Small-227.png
*vdu_controls with all useful controls activated (additional “less useful” controls can be activated via the command line)
https://raw.githubusercontent.com/digitaltrails/vdu_controls/master/screen-shots/Screenshot_Large-330.png - vdu_controls --no-splash --system-tray
https://raw.githubusercontent.com/digitaltrails/vdu_controls/master/screen-shots/Screenshot_tray-200.png
The code for vdu_controls is available on github as well as a detailed README.md and man page. The script was developed on Tumbleweed using the default python3.8 with the additional zypper installs of python38-qt5 and ddcutil.
I tried to write vdu_controls to be as self contained as possible. If ddcutil and python38-qt5 are installed, a copy of the vdu_controls.py script is all that is needed. Supporting icons and a default splash-screen image are embedded inside the script. The script can optionally self install itself into $HOME/bin along with creating an appropriate .desktop menu file. For development all that is needed is an editor and the python3 command. I have added all the normal python source-hierarchy boilerplate for documentation and builds, but only as a learning exercise, none of that is necessary (it’s overkill for one self-contained script).
Possibilities for automatically adjusting brightness according to the ambient light level
One other idea I toyed with was to use an old webcam to measure the ambient brightness and then adjust my monitors automatically as conditions changed. I used ffmpeg and ImageMagick to try and measure the ambient light level from a webcam image, for example:
# Capture one frame
ffmpeg -y -s 1024x768 -i /dev/video0 -frames 1 $HOME/tmp/out.jpg 2>>$logfile
# Resize to one pixel and extract the pixel (max) value, then use variuous substitutions to extract just the numberic value.
ambient=$(convert $HOME/tmp/out.jpg -colorspace gray -resize 1x1 -evaluate-sequence Max -format "%[fx:100*mean]" info: 2>/dev/nulll)
ambient=$(echo $ambient | sed 's/.].*//')
echo INFO: camera ambient maximum $ambient
That didn’t work too well because the camera had built-in automatic exposure, if the ambient light level dropped, the camera increased the exposure. I could roughly determine between night and day, but if clouds moved across the sun my heuristics could get fooled. Perhaps better camera positioning, a fixed image target, some blinkers, or a frosted lens cover might have helped. If I had some better light-metering hardware, some form of automatic brightness adjustment would be quite achievable.
Final thoughts
I hope this post up might help if you need to control a monitor without reaching for it’s physical controls, or if you need to climb the learning curve on Python or PyQt, or if you’d just like to add some desktop favourites of your own.
While we’re on monitor related issues I have another howto post on KDE multiple monitors with different resolutions. If you want to combine a new 4K monitor with older non-4k monitors for an X11 desktop, that post might be worth a look.
BTW, Sanford Rockowitz, the author of ddcutil is also working on a comprehensive GUI, but I think smaller/lighter GUI scripts might still be useful for places such as the system tray.
