Hi everyone.
I have a cool toy I thought I wanted to share, and I need to test some dictation tools, so here goes! I hope you like it ![]() I go into a lot of detail here, but don’t be put off, it’s all pretty simple. I just didn’t want to leave anything out.
I go into a lot of detail here, but don’t be put off, it’s all pretty simple. I just didn’t want to leave anything out.
TL;DR: Simply hit enter or space, or click a GUI button, to securely authenticate to sudo, by using pam_ssh_agent_auth and friends.
Example screenshots:
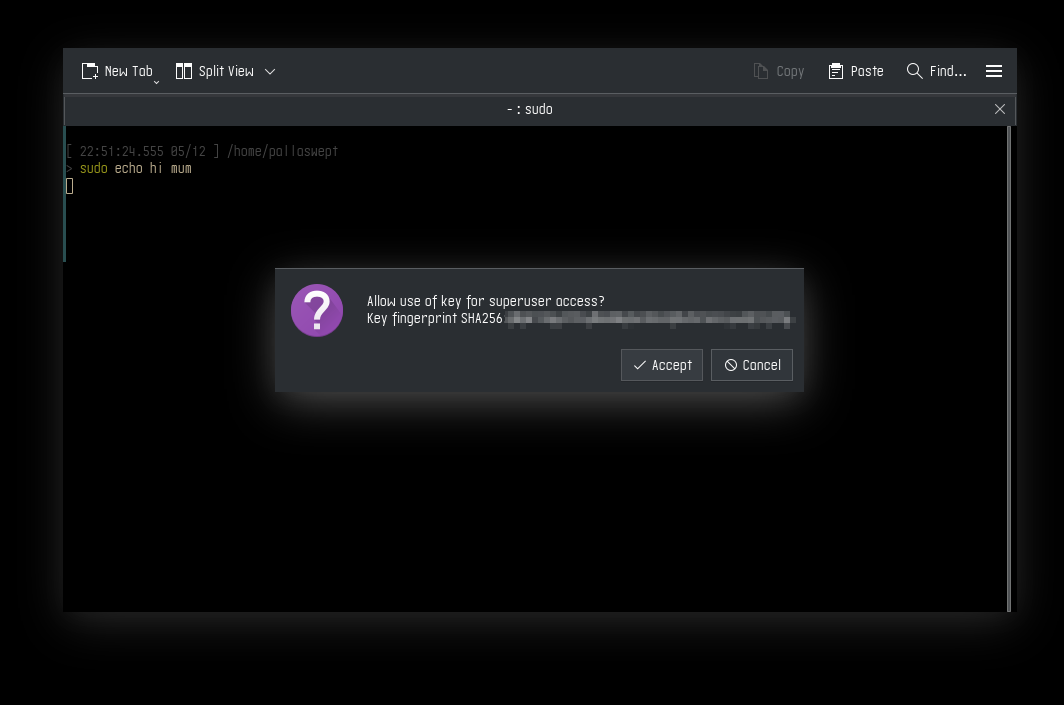
Using sudo in the terminal:
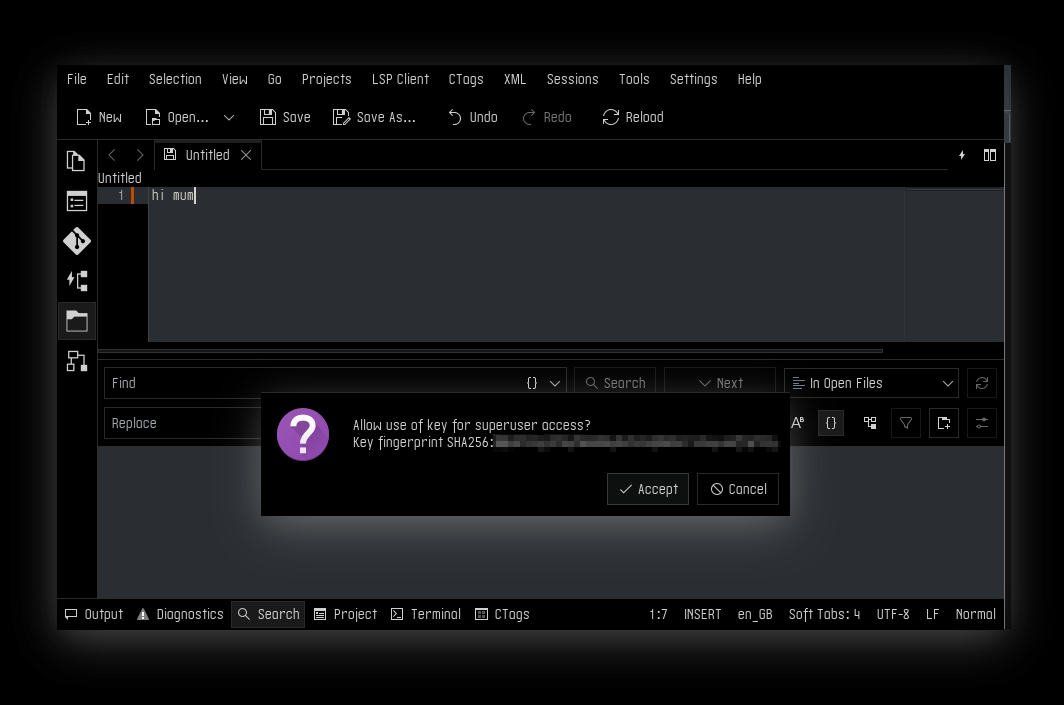
Saving a file in (patched) Kate, to a folder owned by root (it was /):
Not pictured: Uses the DE’s audio notifications to grab your attention when it pops up
Boring fallback terminal prompt (you know what text looks like, right?
My motivation:
I have long been dissatisfied with privilege authorisation on linux desktops. Using sudo is a sub-par experience. You essentially have three options:
- Type your password every time, which is annoying, unless you have a very simple password, which is insecure.
- Type your password never, which is insecure (and extremely common, Hi NOPASSWD users!).
- Type your password every x minutes, which is often the default, and is cool until it is annoying and insecure - If you’ve cached credentials, it will happily sudo rm whatever you accidentally paste in there… But if you open a new terminal, yep, time to type your password in, again.
Dare I say it, Windows handles this well. When something needs ‘root’ (Administrator) permissions, it pops up a simple, secure GUI prompt asking you if that’s OK with you. You just hit enter, or click OK, and you’re good. Or, deny it, if you did that by accident, or it’s not you, or whatever.
I wanted a secure way to get that same level of ease-of-use, and I’m there, and I really really dig it, and I don’t see anyone talking about it, so… I’m gonna do it.
The toolchain:
There are a few small parts that work together to give this experience. This definitely feels like The Unix Way ![]() I’ll just gloss over how it works. Let’s start with the interface:
I’ll just gloss over how it works. Let’s start with the interface:
ksshaskpass. This tool is intended to provide a way to enter a password to an ssh key, but here, we can use it to give us a simple ‘OK/Cancel’ type of prompt. It works in our KDE GUI, and if we’re in a terminal, it will fall back to the terminal-based sshaskpass. Gnome has gnome-ssh-askpass which I haven’t tried but I’m sure will also work.
ssh-agent is the tool which calls ksshaskpass. This ssh agent, holds your private key, and when you attempt to authenticate to ssh, it will match the key from your agent, to the ssh public key, and let you log in if you’re allowed.
pam_ssh_agent_auth is the secret sauce that ties this together. Everything else you need is probably already installed. This is a plugin module for PAM, which is the tool that does all the authentication for our system. All of the above tools, are intended for logging into ssh servers, but, we can use them to login to shells on our system, by using this.
ssh-add, kwallet, keepassxc, you name it… We can use a tool of our choosing, to add the key to the agent. ssh-add is the stock CLI tool, and kwallet for the GUI, but personally, I’m using keepassxc. When I unlock my keepass database, it adds the key from the database to the agent.
So now, after we unlock our password database/wallet/keychain/whatever, we sudo, and it tries to authenticate us, uses PAM to do that, PAM tries to authenticate us by using pam_ssh_agent_auth, which contacts our ssh-agent which holds our keys, which asks us for confirmation to allow use of the key using ksshaskpass.
It’s all as secure as ssh keys are, and we get a nice GUI or CLI prompt, easy to confirm by slapping enter or space bar, or whoops out of it by hitting esc. If this fails for whatever reason, no biggie, it just falls back to prompting us for our password exactly like normal.
A nice plus to this is that it’s not just authenticating us for sudo, because it’s using PAM it’s as good as our password for any login we make. So, we can use it for other similar tools, PolicyKit’s pkexec, KDE’s kdesu, or Gnome’s gksu. So, it works for all our GUI and CLI tools.
There is a catch to this last part: policykit, for reasons of security, clears the environment variables of the system in the process which authenticates the user. ssh-agent uses a socket for communication with other applications, and the location of that socket file is stored in the environment. This means that when pkexec runs pam_ssh_agent_auth, it can’t find the ssh agent, so it fails, and we still have to type our password. There is a solution to that, which is a patch to pam_ssh_agent_auth, which allows us to specify a default path to use, when the environment variable is not present, to find the ssh-agent socket file. The patch is in their github repository upstream, I’ve packaged it for TW and it’s working well. I recommend it, but it’s not needed, to get this working with sudo, which is the lion’s share of our need. The openSUSE Factory version of pam_ssh_agent_auth works fine for that.
HOW TO:
I can’t dictate this last part and I’ve talked enough already ![]() so I’ll mostly just copy-paste my instructions here. I hope the above will serve to explain what each of these steps does.
so I’ll mostly just copy-paste my instructions here. I hope the above will serve to explain what each of these steps does.
Disclaimer: While I’m confident that this is all working and safe, you’re messing with the ability to authenticate as root, here. Please take appropriate precaution. If a disaster happens, just login to the emergency console using the root password and delete the files you created here, and it’ll be back to normal. We don’t change anything here, only add stuff on top.
Create the SSH key for authentication
ssh-keygen -f pam_key -C "for superuser access" -N ""
sudo cp pam_key.pub /root/.ssh/authorized_keys_pam
The private key will be there in your working directory. Be careful with that, it’s effectively as good as knowing your root password.
Add the key to keepassxc
There are tutorials elsewhere on how to use kwallet or ssh-add for this. Same can be said for keepass, so I’ll gloss over this part:
Open up keepassxc, create an entry, go to the ‘Advanced tab’, and Add an attachment, add both of the pam_key files there. Then, go to the ‘SSH Agent’ tab, select the pam_key file as an attachment for the private key. Make sure the three boxes are ticked up the top (Add key, Remove key, Require user confirmation…).
Install the PAM module
sudo zypper install --recommends pam_ssh_agent_auth
If you’re adventurous, you might like to branch my patched branch of this tool so that it works with PolicyKit
Set the environment variable at login
This works for KDE. You could use the profile or whatever is most appropriate for your system.
sudo mkdir -p  /etc/xdg/plasma-workspace/env/ && \
echo 'export SSH_AUTH_SOCK="$XDG_RUNTIME_DIR/ssh-agent.socket"' | sudo tee /etc/xdg/plasma-workspace/env/ssh-agent.sh
Start the SSH agent at login
There are simpler ways to do this, but this is nice, because we can manipulate the agent more easily.
This is a multi-line paste, copy-paste the whole block:
echo '[Unit]
Description=OpenSSH key agent
Documentation=man:ssh-agent(1) man:ssh-add(1) man:ssh(1)
After=xdg-desktop-autostart.target
# export SSH_AUTH_SOCK="$XDG_RUNTIME_DIR/ssh-agent.socket"
ConditionEnvironment=SSH_AUTH_SOCK

[Service]
ExecStart=/usr/bin/ssh-agent -D -a $SSH_AUTH_SOCK
SuccessExitStatus=2
Type=exec

[Install]
WantedBy=xdg-desktop-autostart.target' | sudo tee /etc/systemd/user/ssh-agent.service
Then
systemctl --user daemon-reload
systemctl --user enable ssh-agent.service
Configure sudo
We want sudo to ask us every time, and to remember the path to the ssh agent when it does:
echo 'Defaults timestamp_timeout = 0, env_keep += "SSH_AUTH_SOCK"' | sudo tee /etc/sudoers.d/pam_ssh_agent_auth
Configure PAM
Note that here, we add a line for pam_ssh_agent_auth, and then a bunch of ‘include’ directives. Those use the stock settings, which will be the fallback if our setup here doesn’t successfully authenticate.
These are multi-line pastes, copy-paste the whole of each block:
First for PolicyKit, IF you are using the patched version of pam_ssh_agent_auth (otherwise this part won’t work and you’ll still have to type a password):
echo "#%PAM-1.0

auth     sufficient     pam_ssh_agent_auth.so file=/root/.ssh/authorized_keys_pam default_ssh_auth_sock=/run/user/%U/ssh-agent.socket
auth     include        /usr/lib/pam.d/polkit-1
account  include        /usr/lib/pam.d/polkit-1
password include        /usr/lib/pam.d/polkit-1
session  include        /usr/lib/pam.d/polkit-1" | sudo tee /etc/pam.d/polkit-1
Next for sudo:
echo "#%PAM-1.0

auth     sufficient     pam_ssh_agent_auth.so file=/root/.ssh/authorized_keys_pam
auth     include        /usr/lib/pam.d/sudo
account  include        /usr/lib/pam.d/sudo
password include        /usr/lib/pam.d/sudo
session  include        /usr/lib/pam.d/sudo" | sudo tee /etc/pam.d/sudo
That’s it! you’re done, give it a reboot and enjoy secure and convenient root permission.
If you hate it, just delete the config files we created with sudo tee in the steps above.
If you have ideas to improve upon this, please do share them with us ![]() Some of this is openSUSE-specific (my patched package) and it does lean towards KDE because that’s what I use, but it should work pretty much as-is, anywhere, so please do feel free to post this anywhere else that it might be interesting or helpful to people.
Some of this is openSUSE-specific (my patched package) and it does lean towards KDE because that’s what I use, but it should work pretty much as-is, anywhere, so please do feel free to post this anywhere else that it might be interesting or helpful to people.
I think that adding pam_ssh_agent_auth to a distro is a straight upgrade to the typical linux desktop authentication scheme, and hopefully if enough people find this useful, we might even see distros make something like this, the default. I hope you like it, too!
