When rendering with h264 “kaffeine” shows a green stripe at he bottom. Rendering with Mpeg-4 no green stripe at the bottom when playing with “kaffeine”.
The replay quality varies from player to player …VLC, smplayer, kaffeine.
I had a lot of trouble finding the right settings on my camcorder: Samsung HMX-Q10BP/XSA. Low budget AUD$350.–
The de-shaker did not seem to work, until I found out a setting “Guideline”…testing this (grid or cross) made it work.
With these setting and in Kdenlive , render mepg-4 and “force progressive”, the output quality is good / acceptabel. Kaffeine and VLC play the videos smoothly but not smplayer. Tried all sorts of settings with smplayer so far no success.
An alternative camcorder could be Sony HD RCX 130, which has a better wide-angle as standard however AUD$600.–
There is a transcode command for stabilizing with ‘pure GNU/Linux’ but I find it does not do the same quality output as the virtualdub/deshaker combination.
Thanks for for the hint !!! I will try this. I tried the de-shaker / image-stabiliser with Avidmux and got a reasonable results
By the way for all others who want to buy a HD camcorder, save up an extra AUD $300.-- and look out for the wide-angle capability of the zoom. For $500-$600 you will get something which works “out-of-the-box”. Also check the CMOS chip size, larger chips usually produce better images at low light.
Considering the price of my camcorder $350/ low budget and considering the settings (guideline…grid or cross) it works well.
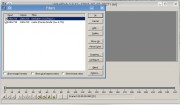
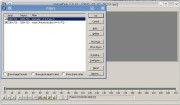
Select your clip and load it into Avdemux. In my case it is a H.264 clip. A pop-up comes up and asks to use “safe mode”. Click “no”. Next pop-up asks for re-building the frames…click “yes”
Click “ok” and close window. Click on “save”…file name etc.
Takes quiet a while to process, takes up all the free RAM.
The result from a very bad shake where even a good image stableiser would have failed (I would say it was more a knock than a shake) was a reasonable interpolation. A little washed out but viewable.
Please let me know when you tested it how it compares to virtual dub
I downloaded your untreated clip and put it through Avdemux and got the same result as far as smooth rotation of the karussell is concerned.
Your clip was very good to begin with and using different players the results where different. VLC showed the choppyness of the rotation, kaffeine slightly and smplayer not at all.
I got Virtual-Dub running as per your “howto”. Virtual-dub does not like my h.264 flies. I converted a choppy clip into avi format and found the deshaker. Unfortunately the resulting clip showed the vectors. I ran it through an “analyse” phase, still the result showed the vectors. Could you please tell me the settings to get the actual “de-shaked” video…
Also there seemed to be a loss in quality…hard to tell with all the vector, and I could not find an option to save in mp4 format.
Next test: I zoomed in onto a road videoing the traffic and pedestriance, The traffic movement was slightly choppy. Then I rendered it with KDEnlive with effect “pan and zoom”. No real improvement. Next I used Avidemux: good result. Smooth traffic.
Its important you set VirtualDub to save at a very high bit rate to avoid the loss of quality. Note also if your video has blur due to shaking movement, then the blur will be much more obvious after deshaking.
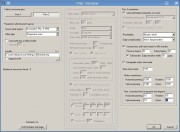
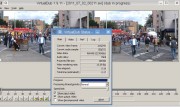
and then here is one way to tune the 1st pass settings. http://thumbnails48.imagebam.com/13958/adbd08139577433.jpg](ImageBam)
I am NO expert in this. I do often tell VirtualDub to avoid movement in some area of the screen that has natural movement that I do NOT want included in the deshaking algorithm, and there are controls for doing that. And then I save the video as a nominal .avi file. Say passone.avi. The name is NOT important.
and I apply the 2nd pass settings: http://thumbnails20.imagebam.com/13958/4d261b139577439.jpg](ImageBam)
the above is an example. Sometimes, if I have a constant scene with NO camera movement (other than my own shaky hand) i will change ‘motion smoothness’ to '-1 ’ for one or all of the four areas, and I will change max correction limits (in perent and degrees) to ‘99’. After I have the settings I want, I save as some name says ‘oldcpu-stabilized-video.avi’ and that will be the stabilized output.
Hi
I did not get much joy out of virtualdub. the vectors showed up at the outputfile, even after a number of “Analyse” runs. Well, Avidemux does the job for me.
By the way I ripped a bluray with makemkv (did not want to stream) and loaded a 15 GB file into Kdenlive. Worked !!!
cheers
Once one has the technique down, virtualdub works fairly easy. I suspect you still don’t have the technique down yet (as there is a ‘technique’ to this). I do 2 runs ONLY, each with different settings. Only the 1st run produces the output vectors (and I never reuse that 1st file). For the first run, I have these settings: http://thumbnails48.imagebam.com/13958/adbd08139577433.jpg](ImageBam)
the output avi file that I save from that has the vectors.
Now I do NOT re-open that file !! That avi file created can and SHOULD be ignored. I think THAT is your mistake. After saving that file do NOT open that file AND do NOT open another file. Do NOT. Do NOT open another file! By saving that 1st file in the 1st pass, somewhere (I don’t know exactly where) virtualdub’s deshaker plugin has created a file that will be used when you immediately go to the next step.
and save that as an avi file. It will be THAT second avi file saving that you can then look at as it will be stabilized !
15GB is massive. If I wish to edit out commercials/small-tidbits, and if I have the right format to start with, I prefer to use the application ‘dvbcut’.
What I did wrong was, that I added the -deshaker twice. one for the first pass the second one for the second pass. the latest test is currently running.
I often will deshake an entire directory of videos at once with this simple (relatively) command:
for i in *.avi; do wine /home/oldcpu/windows/virtualdub/VirtualDub.exe /c /s deshake01.vcf /p $i temp.mp4 /r /x; wine /home/oldcpu/windows/virtualdub/VirtualDub.exe /c /s deshake02.vcf /p $i deshaken_${i/%avi/mp4} /r /x; rm temp.mp4; done
where deskhake01.vcf are the settings for the 1st pass (saved in that file) and deshake02.vcf are the settings for the 2nd pass. I preposition deshake01.vcf and deshake02.vcf in the video source directory.
Reference loss, you need to put the output bit rate VERY high to stop that. ie in VirtualDub under 'video > compression > x264vfw-H.264/MPEG-4 AVC encoder (or Xvid MPEG_4 Codec) you need to tune that to a very high output bit rate. That IMHO stops the loss of noticeable quality. Again, note if the original is out of focus because the video is shaking, then deshaking it with VirtualDub will just make the original out of focus even more obvious.
Hi, the main problem I am facing is that my camcorder delivers natively h.264/mp4 clips. This codec, at least at my virtualdub setup (1.9.11) is not supported. Conversion with avidemux to avi must leave a trace of h.264. Virtualdub is complaining about it and rejects the clip. The successful test was done after rendering with KDEnlive “AVI-DV”, “Pal 16:9”. This in its own right is a resolution downgrade. Higher settings are rejected by virtualdub…crash ! Mp2 rendered files…crash.
I had a short try with Cinelerra (bigger then Ben hur) has and had(always) trouble with libquick.
I wonder what else in the linux world (or via “wine”) gives a good de-shake result.
The other thing I found is that my camcorder is very light, that makes it shakier.
I shot a few clips over the weekend and made sure to have my had as steady as possible. That worked and the result is ok. A deshaker would be good when doing a “snapshot-clip”, just to record the moment.
I wonder when the kdenlive team writes or adopts a de-shaker.
I’ll keep on searching, usually, in the linux world there is something hidden which works well, however is not documented.
Re, kdenlive, It is an excellent tool and very forgiving which lots of options, in my opinion better than openshot.
Just do a global conversion. For example I typically take a 1920x1080 and convert to 1280x720. I convert an entire directory at once. Here is a typical command I send to convert from the Native Camcorder video (1920x1080 @ 25MB/sec bit rate) to 1280 x 720 @ 8MB/sec bit rate that virtual dub will accept. Its much faster to convert an entire directory at once this way (and note you can increase bit rate or resolution if you so desire) …
for i in *.MTS; do ffmpeg -y -i "$i" -f avi -vcodec mpeg4 -b 8000000 -acodec ac3 -ab 128000 -s 1280x720 YYYY_MM_DD_${i/%MTS/avi}; done
Where I like to put the year in YYYY and month in MM and day in DD. My input videos all have the extension .MTS. And I assign the output extension .avi I archive my camcorder videos in separate directories by date.
For example for videos on 10-July-2011 I would send the command:
for i in *.MTS; do ffmpeg -y -i "$i" -f avi -vcodec mpeg4 -b 8000000 -acodec ac3 -ab 128000 -s 1280x720 2011_07_10_${i/%MTS/avi}; done
and that would convert the entire directory of videos with *.MTS extension to a 1280x720 @ 8MB/sec bit resolution/bit-rate.
Then after I have done that, I may or may note deshake all those videos with the other command (calling VirtualDub) I provided previous. Its not uncommon for me to have my Intel Core i7 920 running overnight in a single mass conversion. I spend VERY LITTLE of my time doing such global conversions (as it takes place while I sleep).