HowTo install VirtualDub under wine with deshaker plugin

I debated putting this in our HowTo area, as VirtualDub is an MS-Windows application, however with the “deshaker” plugin it offers a capability that to the best of my knowledge does not exist in Linux, and hence I thought this worth while.

With the “deshaker” plugin, the program VirtualDub (when running under wine) can reduce the shake in one’s home videos taken with one’s Video camera.

I have this working now on three computers: [ul]
[li]Intel Core i7 920 on an Asus P6T Deluxe V2 motherboard running a 64-bit openSUSE-11.2 with KDE-4.3.4 and VirtualDub-1.9.7 under wine-1.1.35-1.1 [/li][li]Dell Studio 1537 laptop with an Intel P8400 CPU running a 64-bit openSUSE-11.1 with KDE-4.3.4 and VirtualDub-1.9.8 under wine-1.1.35-1.1 [/li][li]Athlon-2800 on a Asus A7N8X Deluxe motherboard running a 32-bit openSUSE-11.2 with KDE-4.3.4 and VirtualDub-1.9.8 under wine-1.1.35-1.1[/li][/ul]

My steps to do this with deshaker-version-2.4 were as follows:
[ul]
[li]Step-1 : VirtualDub. Download VirtualDub from here: VirtualDub download (at SourceForge) - virtualdub.org . Place in /home/your-username/windows. Uncompress it into its own subdirectory, and change that to /home/your-username/windows/virtualdub [i][/li]
Test virtualdub in a terminal by navigating to /home/your-username/windows/virtualdub and typing :

wine VirtualDub.exe

now close VirtualDub.
.
[li]Step-2 : ffdshow. Install ffdshow Do NOT use the wine tricks version. Instead go here: ffdshow tryouts | Official Website or here Free-Codecs.com : Download FFDShow MPEG-4 Video Decoder 2009-12-14 and download it to /home/your-username/windows. [/li]
Lets say the file is ffdshow-rev3128-20091108.zip. Then uncompress the file, and install it with:

wine ffdshow-rev3128-20091108.exe

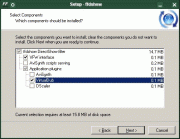
Accept the various default configurations in the associated dialog boxes that pop up.

Ensure you select to install the VirtualDub plugin.

I chose the default settings:

.
Again, note this is a Microsoft application. Also ensure you select to run all 3 of the configurations, including the audio, video and VFW.

.
Installation Note: When I installed this on my 32-bit openSUSE-11.2 PC, I obtained this error below (and thus far it does not appear to have impacted deshaker under VirtualDub). I did NOT get this error on my 64-bit openSUSE :

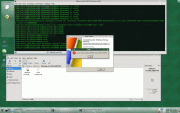
I did not get the above on my 64-bit PCs
.
[li]Step-3 : mcf42 . (possibly not needed with deshaker-2.5) Run winetricks and select “mfc42”. (I am not 100% certain this is necessary, but I did this on my PC. This was part of a work around to ensure the deshaker plugin can be found by VirtualDub running under wine). You can run winetricks by typing:[/li]

winetricks

.
[li]Step-4 : Microsoft Visual C++ 2005 SP1 Redistrib Package.(possibly not needed with deshaker-2.5) Per the guidance in the deshaker web site, http://www.guthspot.se/video/deshaker.htm install under wine the Microsoft Visual C++ 2005 SP1 Redistributable Package: Download details: Visual C++ 2005 SP1 Redistributable Package (x86) … ie download that package to /home/your-username/windows and from a terminal install it with:[/li]

wine vcredist_x86.exe

This package is also needed so that VirtualDub will see the deshaker plugin.
.
[li]Step-5 : XviD codec. Install a codec for encoding. I installed Xvid from the Koepi’s Media Development Homepage - Xvid site. Again, I downloaded the windows file to /home/your-username/windows and from a terminal installed it with:[/li]

wine XviD-1.2.2-07062009.exe

.
[li]Step-6 : download deshaker plugin . Now download the deshaker plugin from this web site: http://www.guthspot.se/video/deshaker.htm (currently the exact download link is here http://www.guthspot.se/video/files/Deshaker.zip ) . Download it to /home/youruser-name/windows and unzip the file. Then take the Deshaker.vdf plugin and copy it to /home/youruser-name/windows/virtualdub/plugins [/li].
[li]Step-7 : check if deshaker plugin found. Now navigate to the VirtualDub directory in a konsole (/home/your-username/windows/virtualdub ) and start VirtualDub with: [/li]```
wine VirtualDub.exe

and go to "Video > Filters > Add " and you should see "Deshaker v.2.4 Gunnar Thalin" in the plugin list.
.
Also take this opportunity to configure your XviD codec for compression by going in VirtualDub to video > compress and select "XviD MPEG-4 codec" and "configure" and configure the XviD codec.
[/ul]
Now all you have to do is figure out how to use VirtualDub and the deshaker plugin, since it is now installed.

.
[b]Some usage hints[/b]

First all, to use the Deshaker plugin in VirtulDub one really needs to examine the guidance given in these web sites: [ul]
[li][Deshaker - video stabilizer](http://www.guthspot.se/video/deshaker.htm)[/li][li][Deshake, Rattle, and Roll! Make your shaky video look much better.](http://www.sundancemediagroup.com/articles/deshaker_guide.htm)[/ul][/li]
In my case, for my Canon HF S10 videos, since I have not figured out how to have VirtualDub load the 1920x1080 @25MB/sec bit rate videos, I deshake my videos in two steps: [ul]
[li]FIRST - reduce them to 1080x720 @ 8MB/sec with a single command (converting an entire directy of videos at once):[/li]

for i in *.mts; do ffmpeg -y -i “$i” -f avi -vcodec mpeg4 -b 8000000 -acodec ac3 -ab 128000 -s 1280x720 year_month_day_${i/%mts/avi}; done

where I hand edit the "year", "month", "day" to be the date in which the video was taken. Put anything you want in that part.
.
[li]SECOND - deshake the entire directory at once. Note I do the deshaking in two passes - to support this I created a custom deshake01.vcf and deshake02.vcf files to define the plugin loading and processing of the two passes.  I put these two files in the same directory as the videos (because I have not sorted my paths yet) and then I deshake the videos all at once with this command:[/li]

for i in *.avi; do wine /home/your-username/windows/virtualdub/VirtualDub.exe /c /s deshake01.vcf /p $i temp.mp4 /r /x; wine /home/your-username/windows/virtualdub/VirtualDub.exe /c /s deshake02.vcf /p $i deshaken_${i/%avi/mp4} /r /x; rm temp.mp4; done


Note the above takes a long time if one has a lot of videos.
[/ul]
The above HIGHLY automatizes the deshaking of my videos.

There is more on this in a KDEnlive thread here:
[Image Stabilization | Kdenlive](http://www.kdenlive.org/forum/image-stabilization-0)

[i]Rev-1 (26-Dec-09) :  added virtualdub download URL
Rev-2 (26-Dec-09) :  added a couple images from ffdshow install
Rev-3 (26-Dec-09) : added a few extra words on setting up XviD codec
Rev-4 (26-Dec-09) : added results of installing on a 32-bit openSUSE and added a couple more pix
Rev-5 (28-Dec-09) : added reference to web pages with guidance on how to use Deshaker with VirtualDub
Rev-6 (04-Sep-10) : added note that steps 3&4 may not be necessary with deshaker v.2.5[/i]

Here is a link to a sample (before/after comparison) of a video “stabilized” with VirtualDub: https://www.youtube.com/watch?v=GaPNf2Rk4qQ

An update:

I have this working now on three computers:

  • Intel Core i7 920 on an Asus P6T Deluxe V2 motherboard running a 64-bit openSUSE-11.2 with KDE-4.3.5
    and VirtualDub-1.9.7 under wine-1.1.44-1.1
  • Dell Studio 1537 laptop with an Intel P8400 CPU running a 64-bit openSUSE-11.2
    with KDE-4.3.5 and VirtualDub-1.9.8 under wine-1.1.44-1.1
  • Athlon-2800 on a Asus A7N8X Deluxe motherboard running a 32-bit openSUSE-11.2 with KDE-4.3.5
    and VirtualDub-1.9.8 under wine-1.1.44-1.1

I have VirtualDub with deshaker-2.4 under wine now running on my Dell Studio 1537 laptop and also my Athlon-2800 on openSUSE-11.3.

VirtualDub with the Deshaker plugin can be tricky to get optimal settings, and for those looking for some guidance there, here are some guides (I have no affiliation to any of these):

The technique I use with long command lines to process an entire directory is different from that noted in the above guides. Occasionally for some clips, I will tune the deshaker settings for the specific clip.

I note there is now version 2.5 of deshaker available. I have been using version 2.4, and I need yet to try version 2.5 to see if I can get it to work under Linux.

I note a change for the C++ and MCF libraries for the version-2.5 change history, and that may invalidate a couple of the steps [ie step-3 and step-4] that I have in my guide above (ie maybe they are not needed for VirtualDub version-2.5):

Version 2.5 (2010-07-18)

  -       When using future frames to fill in borders, you no longer need to manually pre-collect frames and delay the audio etc. Everything is now taken care of automatically, mostly by VirtualDub. This doesn't work for very old versions of VirtualDub, though. In fact, I strongly recommend version 1.9.9 or later.
  -       You can now turn off detection of rotation and/or zoom during pass 1. Read more under the 'Detect rotation/zoom' setting above.
  -       When the setting Remember discarded areas to next frame is enabled, the discarded areas are now remembered for all processed frames, so that when you want to reprocess some frames with other settings during pass 1, Deshaker will know which blocks were discarded in the frame prior to the frame you're starting reprocessing at. This only works as long as the total number of blocks (horizontally and vertically) don't change, which can happen if you, for example, change the block size.
  -       The default edge compensation type was changed from Adaptive zoom to the more basic None, since I want you to decide for yourself if and how the borders should be taken care of. Also, the default smoothness values were changed from 400 (1500 for zoom) to 1000.
  -       **The C++ and MFC libraries are now linked statically. (This means you shouldn't need to install the C++ Redistribution Package any longer.)**
  -       Other smaller changes and bugfixes. For example, I fixed a bug which caused Deshaker to sometimes ignore large areas during pass 1 for certain (unusual) settings.

Hi oldcpu

Thanks for the install HOWTO.:wink:

Just a question, I would like to crop my home video to widescreen format.

What would an easy way to go about?

Cheers from OZ

This is not a function I normally do, and you may get better support on this by posting in a separate dedicated thread in multimedia, as opposed to in a thread about an MS-Windows application (virtual box) running under wine.

Another good place to post such Linux questions used to be in doom9’s Linux forum.

In your new thread, give it a title such as "Crop Video to Widescreen ? "

Still, before ‘sending you away’ I recommend you take a look at google, using key words such as “crop video to widescreen linux” and you will get hits such as:

Thanks for the URLs , that will do.

Hi,

thanks for your howto :slight_smile:

To use the command line for deshaker, where can I get the files with the settings (deshake01.vcf and deshake02.vcf)?

multismo

I just made up my own. In essence they are the 1st pass and the 2nd pass deshaker settings saved when in VirtualDub. I think you need to make up your own as mine is not reuseable. But thats easy to do. Apply the settings for the 1st pass, and save the file as dehake01.vcf. Then apply the settings for the second pass, and save the file as deshake02.vcf. Then once those files are in place, you can exit VirtualDub and do this from the command line.

To prove my point about not useable, here is my deshake01.vcf (note the user lee which would need be changed):
http://pastebin.com/WZ7nfdj8

and deshake02.vcf
http://pastebin.com/VpB7RpqL

… again, just make up your own. You need to run VirtualDub at least once to come up with the optimal 1st pass and 2nd pass settings.

Edit - here is an image displaying the save function:
http://thumbnails7.imagebam.com/10470/9cab58104696692.jpg](ImageBam)

Thanks, I will try it.

multismo

I installed VirtualDub under wine with the deshakerplugin on my recent openSUSE-11.3 install (on my Intel Core i7 920 PC) and I can confirm I did not need to do these two steps (#4 and #5). VirtualDub is running ok under wine with the deshakerplugin with:

  • 64-bit openSUSE-11.3 KDE-4.4.4
  • wine-1.2-0.1.1
  • VirtualDub-1.9.11-build32842
  • Deshaker plugin v.2.6 (2011-01-08)
  • FDSHOW beta7_rev3154_20091209.exe
  • Xvid-1.2.2-07062009.exe

It does a nice job of stabilizing otherwise shaky videos.

Having created this guide over a year and a half ago, I would be remiss if I did not point out that recently I had pointed out to me how to stabilize videos using strictly linux applications. There is a blog explaining how to do this with transcode and mplayer: Deshaking videos with Linux

Following that quoted guide, I found it essential to use the " --mplayer_probe" argument, else it would not work for me (with the videos that I was using for an input).

ie First Pass:

transcode -J stabilize --mplayer_probe -i yourmovie.avi 

and Second Pass:

transcode -J transform --mplayer_probe -i yourmovie.avi -y raw -o yourstabilizedmovie.avi 

I note that I can mostly obtain a better quality stabilization with Virtualdub and wine, but I am still learning how to use the transcode method, and so things could change.

In line with the theme of this thread (using VirtualDub under wine to stabilize a video), a MacIntosh ( ! ) friend of mine pointed out this x264 codec : x264vfw - Browse /x264vfw/1_715bm at SourceForge.net which when I run the executeable under wine :


wine x264vfw_1_715bm.exe

installed an x264 encoder and it works under wine with VirtualDub.

This gives me the choice now (in Virtual dub) of choosing either xvid codec output (from above in a previous post using Xvid-1.2.2-07062009.exe) or x264 codec output.

I note the above Dec 2009 guide works with openSUSE-13.1. I tested with

  • wine 1.7.2-2.1
  • VirtualDub-1.10.4-32bit
  • Deshaker30
  • ffdshow_rev4500_20130106
  • vcredist_x86
  • Xvid-1.3.2-20110601

With the improvements in VirtualDub and the Deshaker plugin, it works better than ever.

Hi, I have created an installer to setup VirtualDub and all needed things (including Deshaker) in one step, it would be nice to know if it works fine under wine.

It is here: http://fileforum.betanews.com/detail/VirtualDub-AIO/1425352862/1

Yes, it seems to work. I tried it today 14-May-15.

It took me a while before I was willing to test it, as I did not have a ‘clean’ PC in which to use for what I considered a proper test.

After installing it, it also took me a while to get running. Virtualdub under wine is a bit sensitive to codecs being installed, and if the codecs don’t like wine, then vitualdub will crash. The codecs setup with the script are different than what I have installed, so it took me a while (some trial and error) to find a ‘compression’ (codec) in virtualdub that did not result in a crash.

But it does work in wine, and its a fast way to get this up and running - especially if one knows which compression to use. Thanks for creating the script.