Desktop capture and two audio sources
pavucontrol and ffmpeg running with simultaneous computer audio and mic audio recording is a neat feature of pavucontrol allowing one to have a neat recording of one’s desktop, with multimedia playing and one talking on their Mic.
I successfully performed this on my 64-bit openSUSE-12.1, recording my desktop which was playing a video (with audio) and at the same time recording what I was saying in my external mic. ie ffmpeg recorded from two separate audio inputs at the same time (using pulse audio) and recorded the desktop video at a resolution of 1920x1280. Note this was on a > 3-year old Core i7 920 computer. Users with slower CPUs may wish to use a lower resolution. Also 1920x1280 is far too high a resolution for a video tutorial.
Caution
Before I explain how I did this, first when doing this for the first few times with ffmpeg and pavucontrol, do not have any unnecessary applications open (that may use multimedia) as they may confuse one wrt the many options that pavucontrol will provide. For example, a browser is also a multimedia app, so do not have any browsers open initially, until you learn enough about pavucontrol use such that you can recognize a browser entry in it.
My biggest complaint about pavucontrol is it does not provide sufficient detail in its labels to avoid ambiguity. I find that unfortunately pavucontrol’s labels are not always as clear as one might want, which is another reason why it is important not to have too many applications running when doing this screen capture (until one can recognize the various apps in pauvcontrol).
Overall Method
The way I performed this, was to have the audio from the computer and the audio from the mic sent to an audio sink. And I had ffmpeg record the audio sink in addition to record the desktop video. It was that basic. The controls were not quite so basic to set this up.
Create an Audio Sink in pavucontrol
Now we need to create a sink to mix the captured audio. Pulse audio will refer to this sink by the term ‘null’. To do so we need load the module ‘null sink’. We also we need to redirect the capture of the two capture streams (from the mic and from the internal computer audio) into this new ‘null sink’ so we load two instances of the loopback module so as to redirect (loopback) those two captures into the ‘null’ (sink).
The command to create the audio sink (as a regular user):
pactl load-module module-null-sink sink_name=mixcapture
and the commands (as a regular user) to create two instances of a loop back (so to direct the computer audio and the mic input to the audio sink are)
pactl load-module module-loopback sink=mixcapture
pactl load-module module-loopback sink=mixcapture
ie I simply ran the same command twice.
Note the above will only last until the terminal in which they are executed is closed, and will not survive the 1st reboot. The advantage here is a reboot will clean up everything, so it is perfectly safe to mess with this (although after a reboot you may need to go into pavucontrol and fix any strange settings you applied).
Start recording:
So lets start recording with (where the following is all one line):
ffmpeg -f pulse -i default -f x11grab -r 15 -s 1920x1200 -i :0.0 -acodec pcm_s16le -vcodec libx264 -pix_fmt yuv422p -threads 0 output00.avi
That is a very high resolution 1920x1280. One may instead wish to reduce the resolution/capture size and tune the " -i :0.0 " setting to a limited area of the desktop. But I won’t get into that tuning here.
So now the desktop is recording, I went into ‘pavucontrol’ and tuned its settings:
pavucontrol settings
Now lets look at my pavucontrol settings.
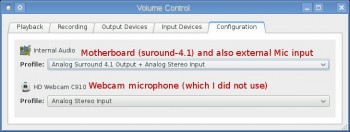
pavucontrol Configuration Tab
First here is my configuration tab.
http://thumbnails42.imagebam.com/19086/6b4104190854021.jpg](http://www.imagebam.com/image/6b4104190854021)
[click on image for a larger view]
You can see two entries:
- Internal Audio
- This is set to “Analog Surround 4.1 Output + Analog Stero Input” which is my motherboard surround sound and an input audio (my external mic) - HD Webcam C910
- This is set to “Analog Stereo Input” and it is my webcam mic - which I did not use for this example
pavucontrol Input Devices Tab
Next here is the Input Devices Tab.
http://thumbnails7.imagebam.com/19086/5bafb9190854022.jpg](http://www.imagebam.com/image/5bafb9190854022)
[click on image for a larger view]
Note at the bottom of that above image, I have ‘Show’ set to ‘All Input Devices’. That is important to ease one’s understanding. Here you can see:
- Internal Audio Analog Stereo
- That is my external mic, which in this case is plugged into the PC’s front microphone jack (so I selected Front Microphone) - HD Webcam C910 Analog Stereo
- That is my webcam mic. For this example I did not use that mic. - Monitor of Internal Audio Analog Surround 4.1
- That is the computer audio - Monitor of Null Output
- That is the Audio ‘sink’ that I created above. One can direct audio input from applications/devices into this sink
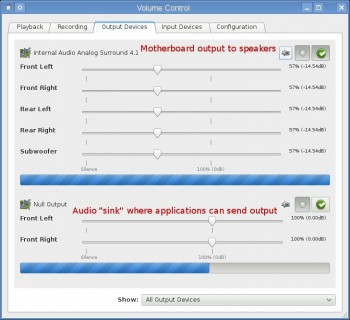
pavucontrol Output Devices Tab
Next here is the Output Devices Tab.
http://thumbnails74.imagebam.com/19086/25a8db190854025.jpg](http://www.imagebam.com/image/25a8db190854025)
[click on image for a larger view]
Note at the bottom of that above image I have ‘Show’ set to ‘All Output Devices’. That is important to ease one’s understanding. Here you can see:
- Internal Audio Analog Surround-4.1
- this is the computer audio which can have an output - Null Output
- this is the Audio ‘sink’ that I created above, where this Audio ‘sink’ can also have an output
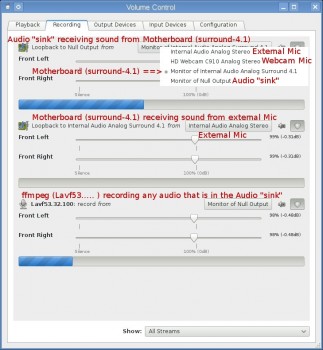
pavucontrol Recording Tab
Next here is the Recording Tab.
http://thumbnails30.imagebam.com/19086/eebb59190854031.jpg](http://www.imagebam.com/image/eebb59190854031)
[click on image for a larger view]
Note at the bottom of the above iamge I have ‘Show’ set to ‘All Streams’. That is important to ease one’s understanding. Here you can see:
- Loopback to Null Output from
- Here I have ‘Monitor of Internal Audio Analog Surround 4.1’ selected. This means that the ‘Computer audio’ is being directed into the Null Output, which is the ‘Audio’ sink - Loopback to Internal Audio Analog Surround 4.1 from
- Here I have ‘Internal Audio Analog Stero’ selected. If you recall, ‘Internal Audio Analog Stereo’ is my External (front) Mic. So this means the External Mic output is being sent to join the audio in the ‘Computer Audio’. - Lavf53.32.100: record from
- Here I have ‘Monitor of Null Output’ selected. Lavf53.31.100 is the application ffmpeg. And ‘Monitor of Null Output’ is the output of the Audio ‘Sink’. So this tells ffmpeg to record what ever is being sent to the Audio ‘sink’. And from above we can see that the ‘External mic’ output is being sent to the ‘Computer Audio’ which in turn is being sent to the Audio ‘sink’. Hence ffmpeg by recording the ‘Null Output’ is in fact recording the ‘Computer Audio’ which has the External Mic input also inside.
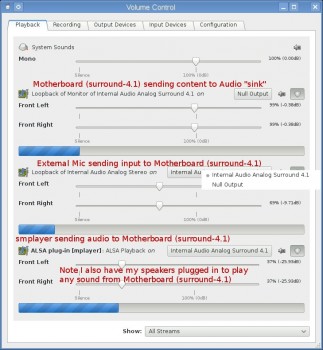
… continued … My next post will provide detail on the Playback settings I had in place.